Pixel 3 Travel Background, When packing for a trip, it’s important to have a travel background that will make your photos look as good as they do in your head. But with so many online options, how can you pick the perfect one? This article will show you how to create a pixel 3 travel background in minutes using some of the best free tools.
What is Pixel 3?
Pixel 3 is the latest phone from Google. It has many new features, and we think it’s worth considering if you’re in the market for a new phone. Here are seven things to know about Pixel 3:
Read Also: Which Travel Card Is Best
- The phone has a new design that’s more compact and sleek.
- The phone has a new camera system that lets you take better pictures and videos.
- The phone has an updated version of Google Assistant that can do more than ever.
- The phone comes with a new launcher that makes the user experience much smoother.
- The phone comes with 64GB of storage, which is more than most other phones on the market.
- The battery life is improved over previous versions of the Pixel phone, so you can stay connected longer without constantly recharging.
- The phone is available in two colors — black and white — and it’s available now at most retailers across the U.S.
What is a Pixel Travel Background?
A Pixel Travel Background is a photo background consisting of a series of small squares. Uploading it to your blog, website, or other digital media platform will create the illusion of traveling across different continents.
Many different Pixel Travel Backgrounds are available on the web, but some of the most popular ones include Africa, Asia, Europe, and South America. You can find them by searching for “pixel travel backgrounds” or “travel backgrounds” on Google or other search engines.
Creating a Pixel Travel Background is simple. First, you must gather a set of photos representing different regions of the world. You can use stock images or photos you’ve taken yourself. Once you have your photos, you must start creating the background.
You must start by arranging the photos into squares to create the background. You can use any size square that suits your needs; however, it is recommended that you make the background as large as possible to appear as if it’s taking up the entire screen.
Once you have assembled all of your squares, it’s time to start editing them. You will want to remove any unwanted elements from each photo, such.
How to Download a Pixel Travel Background?
If you’re looking for a pixel travel background on your phone or computer, you can download one from Pixel Travel. Pixel Travel has a wide range of pixel travel backgrounds that you can use to add some spice or novelty to your travels.
To download a pixel travel background, click on the link provided and select the file you want to download. Once you have downloaded the file, you can save it to your computer or phone.
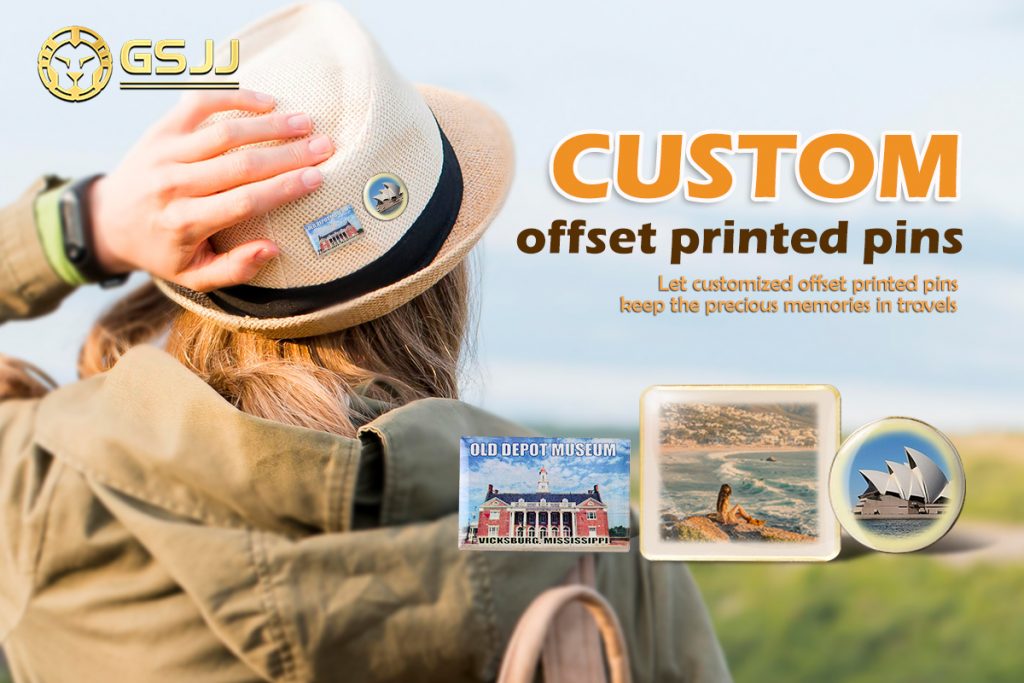
Besides its intended use, there is another way to make the most of it. For travelers, It must be meaningful to collect something containing the memories on trips. Try customizing your own offset printed pins with unlimited colors and it’s easy to turn the photos you take of the famous sightseeings, good views, or the pics you download on pixel travel background into real items to wear on clothes, hats, bags. And such souvenirs designed by yourself can be good choices to give friends as gifts. If you don’t like the texture of offset printed pins, you can find all the other types of custom lapel pins no minimum at GS-JJ.com.
How to Use a Pixel Travel Background?
To use a pixel travel background, open the Backgrounds window by clicking on the Edit Background button in the toolbar at the top of your screen.
Next, select the destination background and click on the Open button. You will now see a preview of your destination background in the window.
To change the size or position of your destination background, drag it around the screen. You can also resize it by selecting the Width and Height buttons and entering a new value.
When you’re done, click the Close button to return to the Backgrounds window.
How to Get the Perfect Pixel Travel Background
You must decide on your destination and focal point to get the perfect pixel travel background. Once you have that information, start searching for images that fall into those parameters.
For example, if you are heading to Rome, look for photos of the Colosseum or the Pantheon. If you want to take a beautiful landscape photo, search for photographs of Iceland or Norway.
Once you have picked an image or images, it is time to find a Pixlr account that meets your needs. Start by looking through the different portfolios and selecting the one that best suits your needs and budget. Once you have selected, sign up and begin uploading your photos!
What are the Benefits of Having a Pixel Travel Background?
Having a pixel travel background can be a great way to improve your travel experience. There are several benefits to having a pixel travel background, which include:
- You’ll be able to relax and enjoy your trip more. With a pixel travel background, you’ll be able to take in the sights and sounds of your destination without worrying about anything else. You won’t have to worry about missed connections, lost luggage, or other problems that can come with traveling.
- You’ll be able to get more out of your travels. A pixel travel background will help you learn about the culture and history of the place you’re visiting. You won’t have to worry about taking pictures or recording videos – all of that will be taken care of by the background itself.
- You’ll be able to avoid scams. By knowing the cultural customs of the place you’re visiting, you’ll be better prepared for scams and other dangers that might be present in the area.
- You’ll feel more connected to your surroundings. By using a pixel travel background, you’ll be able to share
What to expect when using a Pixel Travel Background?
When you use a Pixel Travel Background, you will be able to create a beautiful and unique travel background for your photos. The Pixel Travel Background is easy to use and can be customized to match your photos.
First, choose the photo you would like to use as the background. Next, open the Pixel Travel Background app and select the photo. You will then need to choose the size of the background. You can choose from a variety of sizes, or you can let the app customize it for you.
The next step is to choose the location where you would like your photo to appear. You can choose from several locations or let the app create a custom location for you. Once you have chosen your location, select OK to save your background.
Conclusion
Look no further if you’re looking for a pixel 3 travel background to use in your blog posts! Our selection of pixel 3 backgrounds is perfect for bloggers who want to show off their latest design work or add an element of personality to their blogs. We have a wide variety of backgrounds that are sure to please, so check them out today.